Deploying .Net Core apps in Linux with Nginx reverse proxy

As we know that .Net Core can be deployed into any platform including server less cloud platform here we are going to talk about deploying in Ubuntu Server with Nginx as reverse proxy. DotNet Core offers a light-weight self-hosting server called Kestrel which will run behind the Nginx to full fill our hosting requirement.
Pre-requisites:
- Ubuntu Server
- Nginx Installed
In Ubuntu 22 and higher you don’t need to import package repository as it is built-in. If you are in lower version of Ubuntu then you need to register and import the Microsoft package repository. Hence skip the step below if you are in Ubuntu 22 or higher.
Open your SSH terminal and perform below commands one by one.
# Get Ubuntu version
declare repo_version=$(if command -v lsb_release &> /dev/null; then lsb_release -r -s; else grep -oP '(?<=^VERSION_ID=).+' /etc/os-release | tr -d '"'; fi)

# Download Microsoft signing key and repository
wget https://packages.microsoft.com/config/ubuntu/$repo_version/packages-microsoft-prod.deb -O packages-microsoft-prod.deb

# Install Microsoft signing key and repository
sudo dpkg -i packages-microsoft-prod.deb

# Clean up
rm packages-microsoft-prod.deb
Update your Repository
sudo apt update
Install .Net Core 8.0
sudo apt install aspnetcore-runtime-8.0
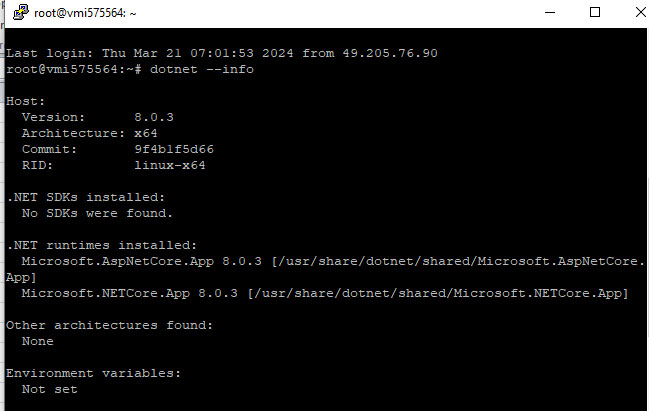
To Test your installation by running below command which should result the version information of .Net core runtime like below screen.
dotnet –info
Let’s create a .net core project, publish it and place it to web server
- Let’s create a WebAPI project using visual studio and publish it to a folder.
- Now create a folder in your Linux server for this app.
- Use filezilla or other FTP tools to move the published file to the linux directory you have just created.
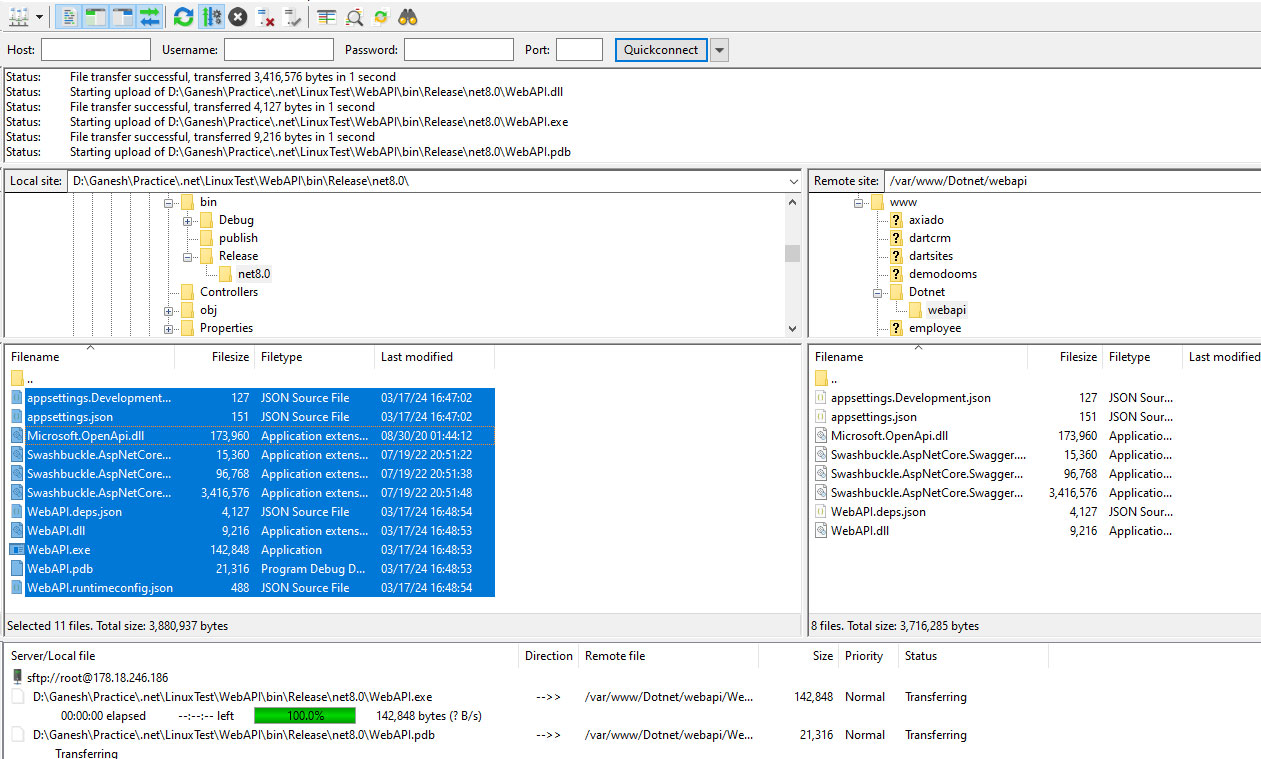
- From the terminal navigate to the app folder.
cd /your/app/folder/
- Run the app on top of Kestrel web server using below command.
sudo dotnet YourAppName.dll
Now your app should be running at http://localhost: 5000. As Kestrel runs in foreground we need to keep the SSH session open. To avoid this we will need to register the Webapp as a service so it always runs in the background.
Configure the ASP.NET Core Web App To Run as a Service:
To create the service, we first need to create the configurations in a systemd unit file. The unit file contains information regarding the unit, which is a service in this case. For services, it should have the .service extension and contain some information about the service. These files are required to be in the /etc/systemd/system directory.
Let’s create a service file called DotNetcore.service
nano /etc/systemd/system/ DotNetcore.service
[Unit]
Description=ASP.NET Core Web App Service on Ubuntu
[Service]
WorkingDirectory= /var/www/Dotnet/webapi
ExecStart=/usr/bin/dotnet  /var/www/Dotnet/webapi /WebAPI.dll
Restart=always
# Restart service after 10 seconds if the dotnet service crashes:
RestartSec=10
KillSignal=SIGINT
SyslogIdentifier=dotnet-web-app
# This user should exist on the server and have ownership of the deployment directory
User=www-data
Environment=ASPNETCORE_ENVIRONMENT=Production
[Install]
WantedBy=multi-user.target
save It.
Enable and start the new service using below commands.
sudo systemctl enable kestrel-app.service
sudo systemctl start kestrel-app.service
Configure Nginx to work as reverse proxy:
Assume, you already have installed and using Nginx if not just install it using sudo apt install nginx
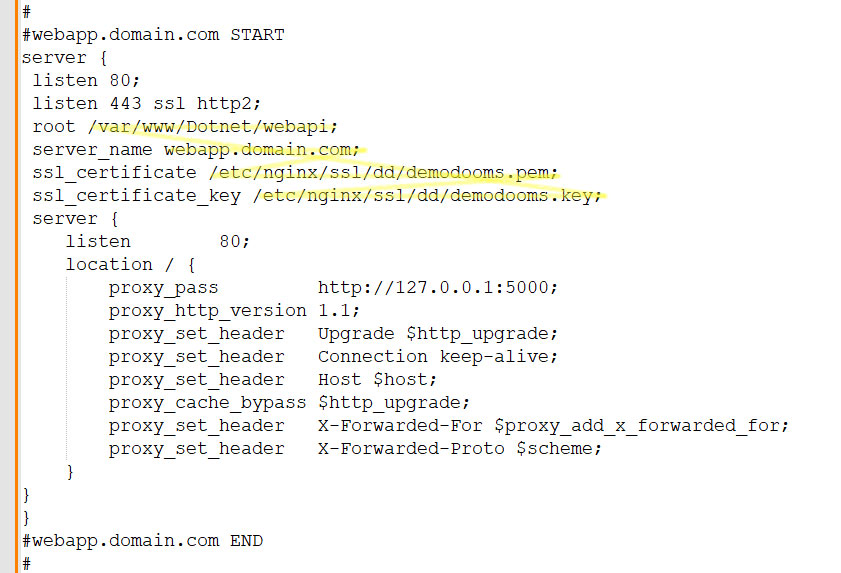
Let’s edit the Nginx website configuration file. /etc/nginx/sites-available/default. I am opening using Notepad++ but you can simply use Nano to edit in terminal itself.
server {
 listen 80;
 listen 443 ssl http2;
 root /var/www/Dotnet/webapi;
 server_name webapp.domain.com;
 ssl_certificate /etc/nginx/ssl/dd/demodooms.pem;
 ssl_certificate_key /etc/nginx/ssl/dd/demodooms.key;

    location / {
        proxy_pass         http://127.0.0.1:5000;
        proxy_http_version 1.1;
        proxy_set_header   Upgrade $http_upgrade;
        proxy_set_header   Connection keep-alive;
        proxy_set_header   Host $host;
        proxy_cache_bypass $http_upgrade;
        proxy_set_header   X-Forwarded-For $proxy_add_x_forwarded_for;
        proxy_set_header   X-Forwarded-Proto $scheme;
    }
}
Remember to change the highlighted values to yours. Also remove 443 and SSL if you only want to use http at port 80.
Now make a Nginx restart. sudo service nginx restart
Access your website and that should be running like a charm.